Open Source Web Based HF SDR
UberSDR is a powerful, web-based SDR platform for amateur radio enthusiasts, providing real-time access to the entire HF spectrum and multi-band WSJT-X skimming. Support for third party software via SoapySDR as well as a native desktop client. Based on the affordable RX-888 MKII and generic PC hardware. Powered by ka9q-radio.


Features
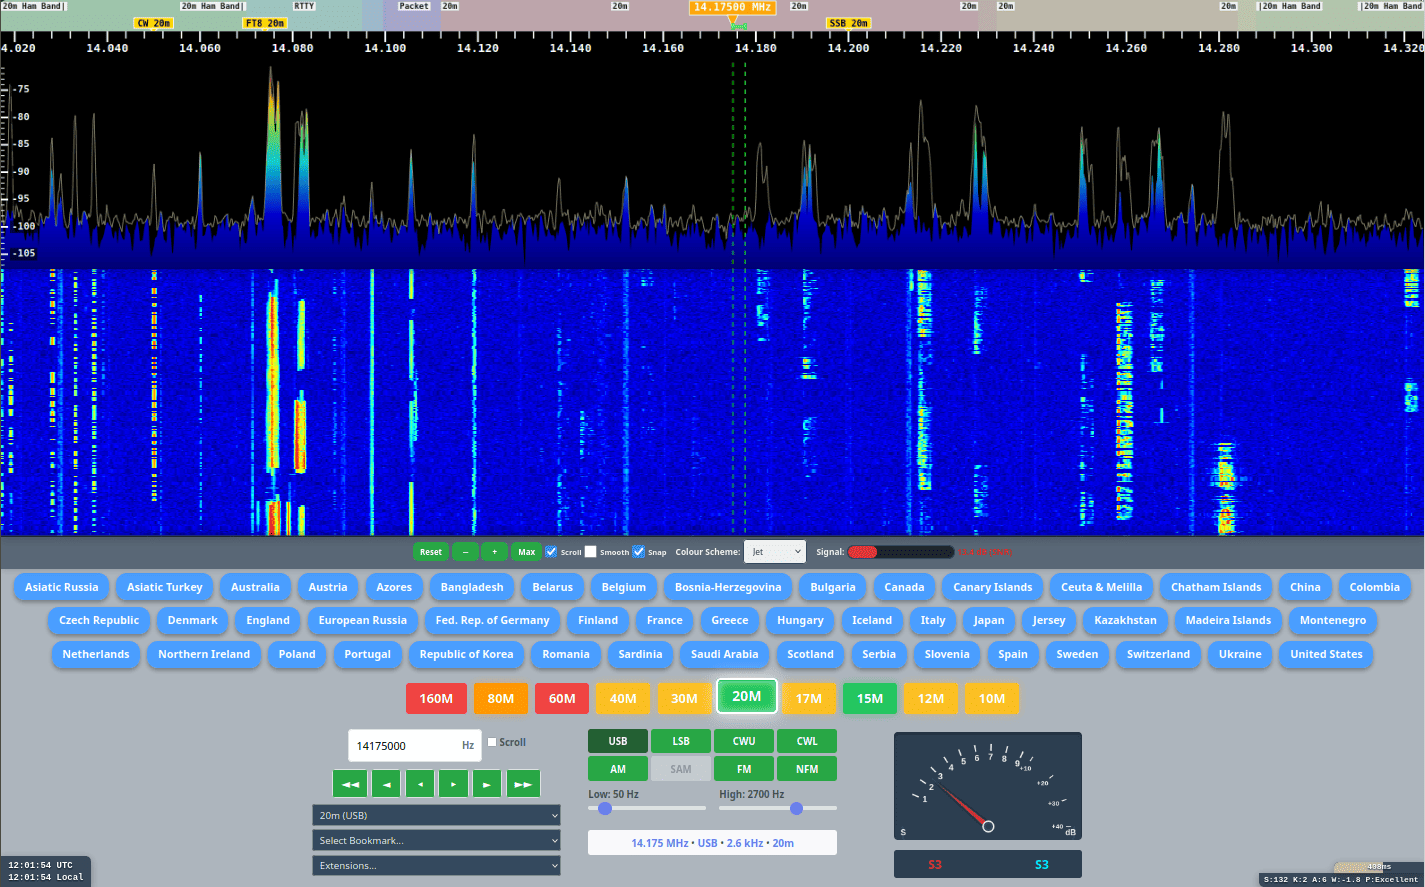
Real-Time Spectrum Analysis
Monitor all HF bands in real-time with background data collection. Historical data is stored enabling analysis of propagation patterns over time.
Many Users
Supports tens or even hundreds of simultaneous users, each independently accessing any HF band at the same time.
Efficient architecture ensures minimal resource usage per user for both demodulated and IQ channels.
Multiple Decoders
Support for all-band skimming of various digital modes including FT2, FT4, FT8, JS8 and WSPR.
PSKReporter and WSPRnet support built in.
Accessibility Options
Keyboard shortcuts for every button ensure full control without a mouse.
Voice announcements for frequency and mode changes keep you informed while operating.
Speech to Text
Transcribe speech to text in real time for easier monitoring and logging.
Translate to and from multiple languages for international communications.
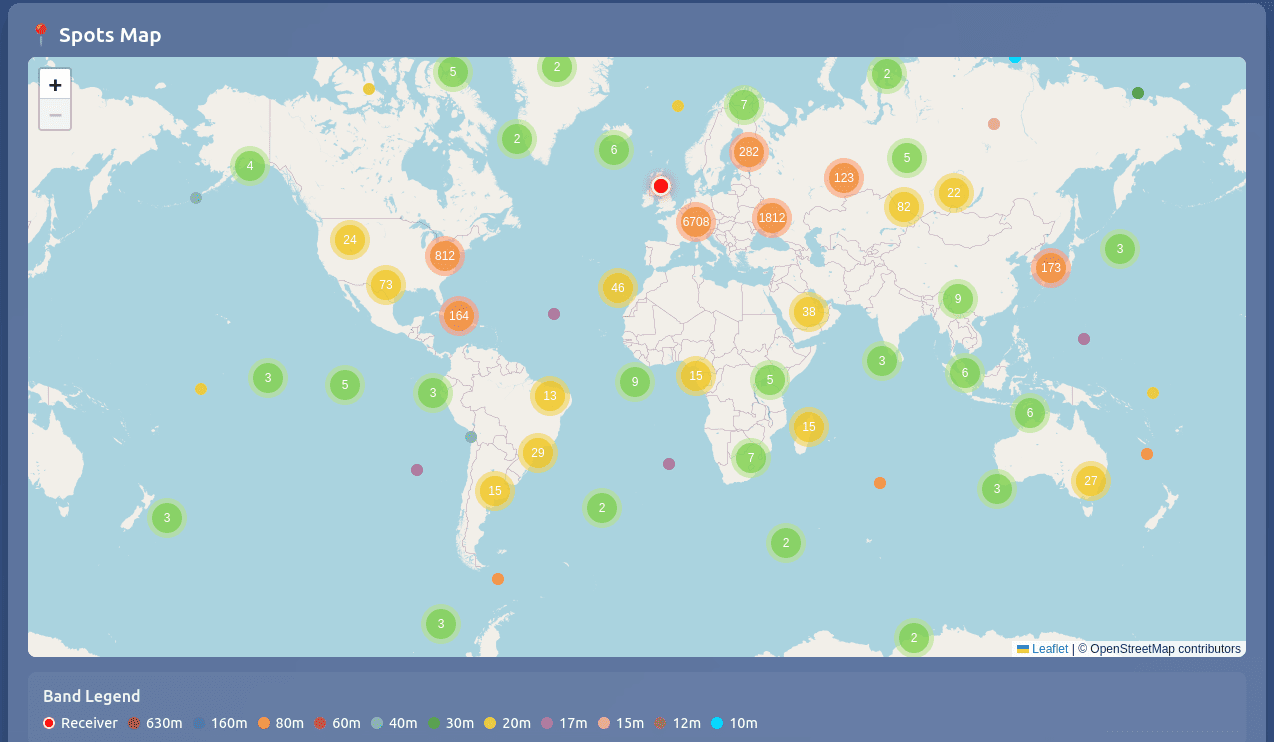
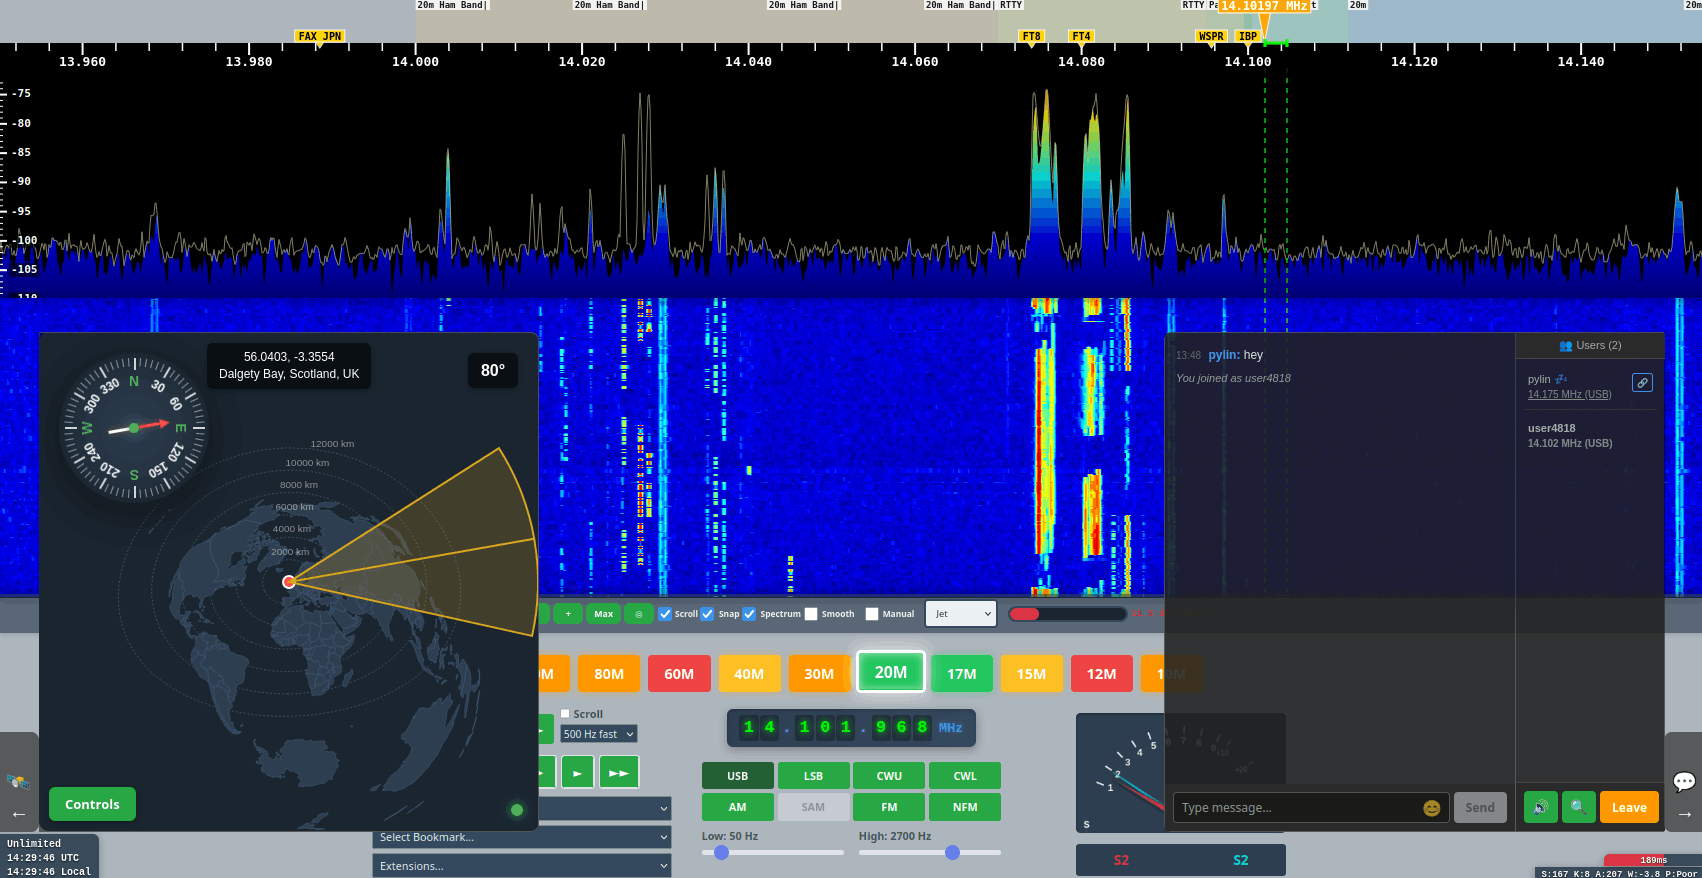
Listener Map
Shows listeners on a world map in real-time. Each listener also appears on a frequency bar.
Easily see popular listener frequencies and discover what others are tuning into.
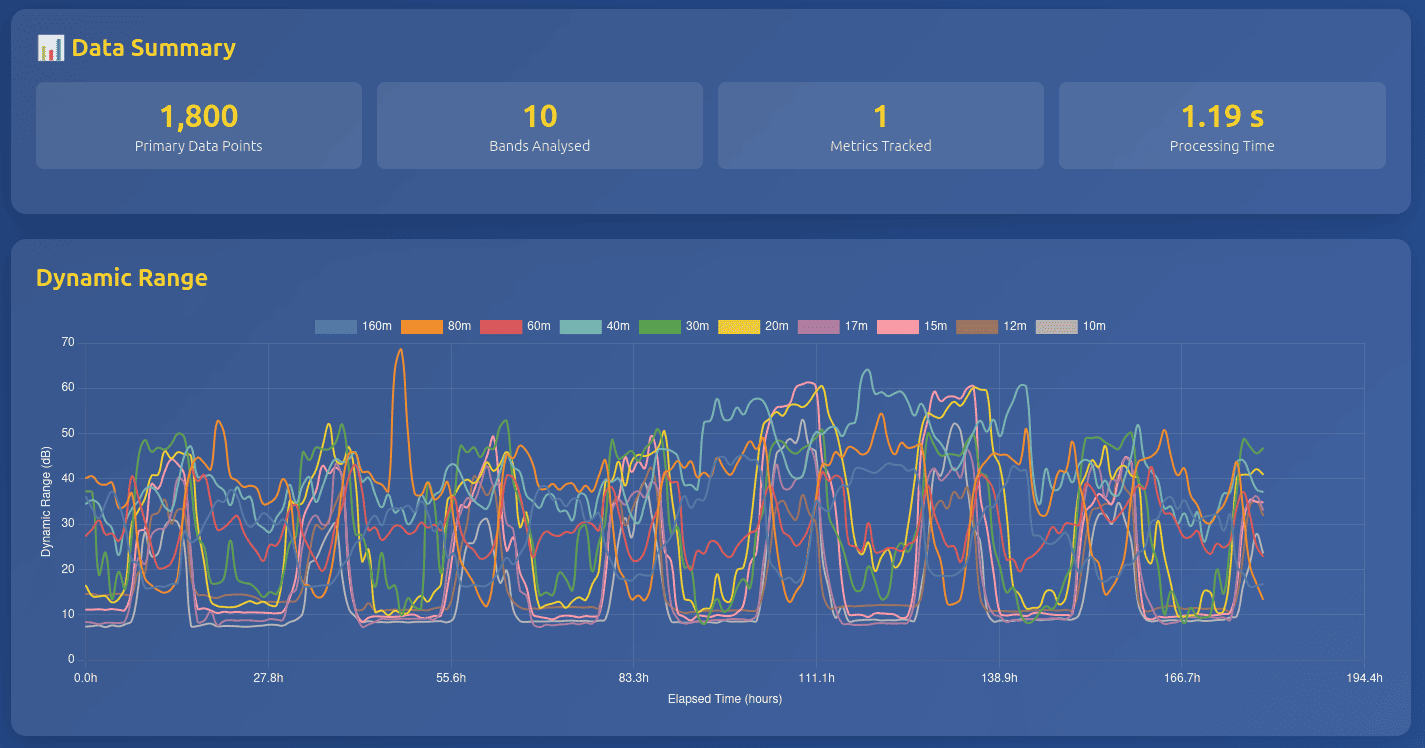
Band Conditions
Track propagation conditions and band activity with integrated monitoring tools.
SoapySDR Driver
SoapySDR driver with authentication for wide IQ streams. Connect external SDR applications with secure access control.

CW Skimmer
Includes driver and monitoring tool for VE3NEA's Skim Server (8x192 KHz).
Live Chat
Talk to other users in real-time, hear what each other are listening to and synchronise with a user for collaborative listening sessions.
Frequency Reference
Track a known accurate signal and provide offset information over time. Works with WWV or any stable reference signal for precise frequency calibration.
Rotator Control
Supports Hamlib Rotctl integration including automated scheduling and password protected remote control for antenna positioning.
MQTT Support
MQTT support for real time metrics and decoder data. Perfect for automation and dashboards with Home Assistant and Node-RED.
Prometheus Endpoint
Prometheus endpoint for integration into Grafana to generate useful metric visualisations.
Admin Control Center
Web based Admin control center for configuration, management and access control. Includes configuring background decoders and monitoirng system health.
Public or Private
Owners can make their instance public or keep it private. Public instances are discoverable by any client application.
Automatic TLS and DNS are available:
- Zero config tunnel (ubersdr.org)
- Port forward (ubersdr.org or own domain)
- Cloudflare (own domain)
API Driven
Frontend is entirely API driven, making creating custom client applications easy.
Spectrum and decoded data is also available via APIs for offline analysis.
KiwiSDR compatible port available for integrating with existing applications.
Modest Hardware
Minimal CPU requirements means even 10 year old mini PCs can support 50+ simultaneous channels.
An Intel N100 can support multiple users and modest skimming with ease.
For multi mode all band skimming, high performance stations with good all band SNR should consider a more powerful CPU, such as a 13th Gen i7 or Ryzen equivalent MiniPC.
Public Instance Directory
Explore publically accessible instances of UberSDR. The owner of each instance can choose to make it public and be added to the directory service.
The directory is integrated into all clients to make discovering other instances quick and easy.

Desktop Client
Access UberSDR from your desktop even if you don't run an instance yourself.
The client acts like a physical radio with audio routing and CAT control allowing direct use with popular applications like WSJT-X and Fldigi. Also supports TCI for combined CAT/audio over the network for software like JTD-X and SDC (Software Defined Connectors).
Download the UberSDR desktop client for your operating system to access instances
with a native application experience.
- Public instance discovery
- Rigctl, Flrig, OmniRig & TCI
- MIDI controller support
- High bandwidth IQ streams
- Full GUI or headless CLI
- Flexible audio routing


Windows Utilities
For Windows users, these free utilities are highly recommended for routing audio and creating virtual serial ports. They enable seamless integration with third-party applications like WSJT-X and Fldigi.
🔌 Virtual Serial Ports
The UberSDR client can emulate a Kenwood TS-480 when required. Create virtual COM ports to connect the client with applications that require CAT control via serial ports.
Free Virtual Serial Ports →🔊 Virtual Audio Cable
Route audio between the UberSDR client and digital mode applications like WSJT-X, Fldigi and others.
Desktop Client Screenshots
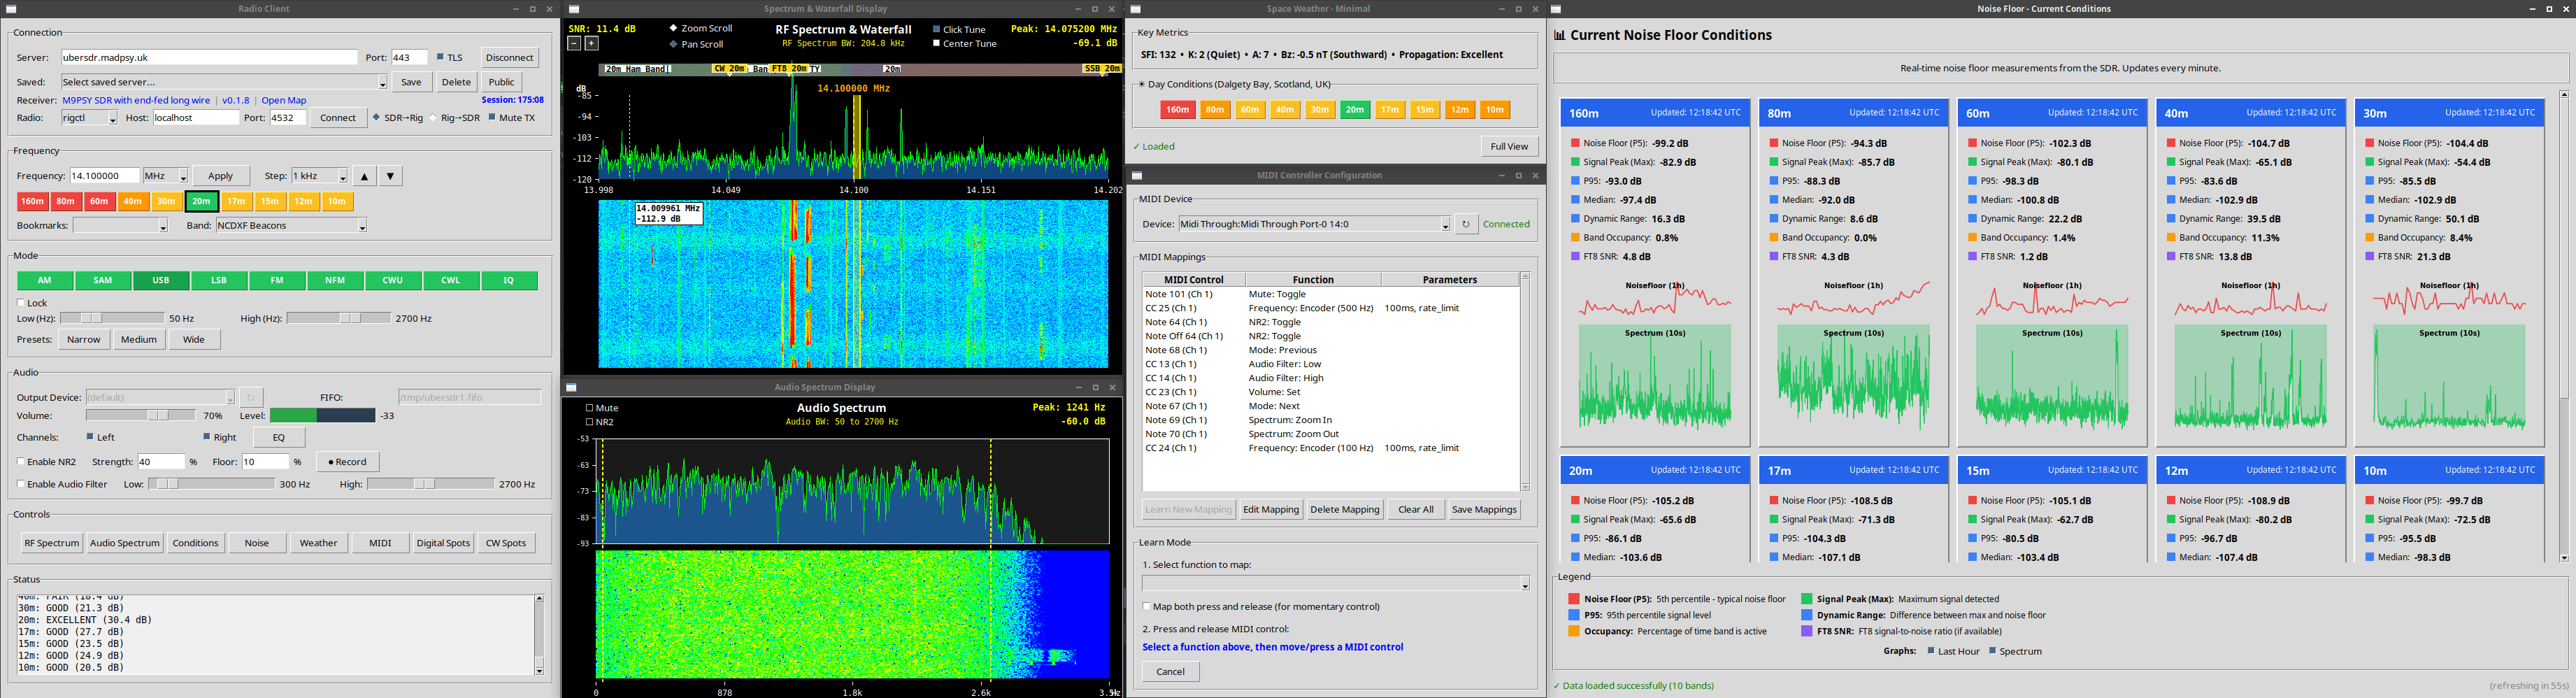
Multiple Windows Support
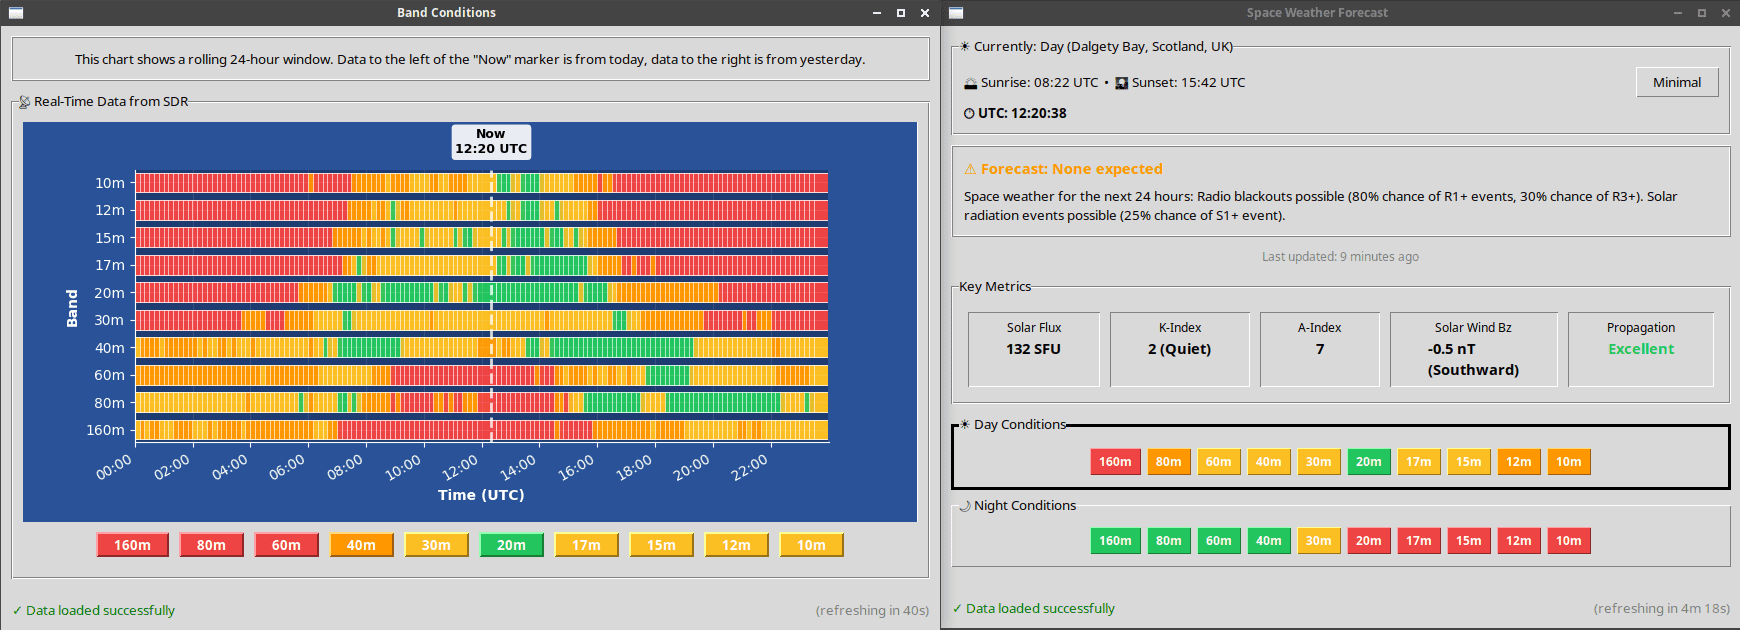
Band Conditions Monitoring

CW Spots Display
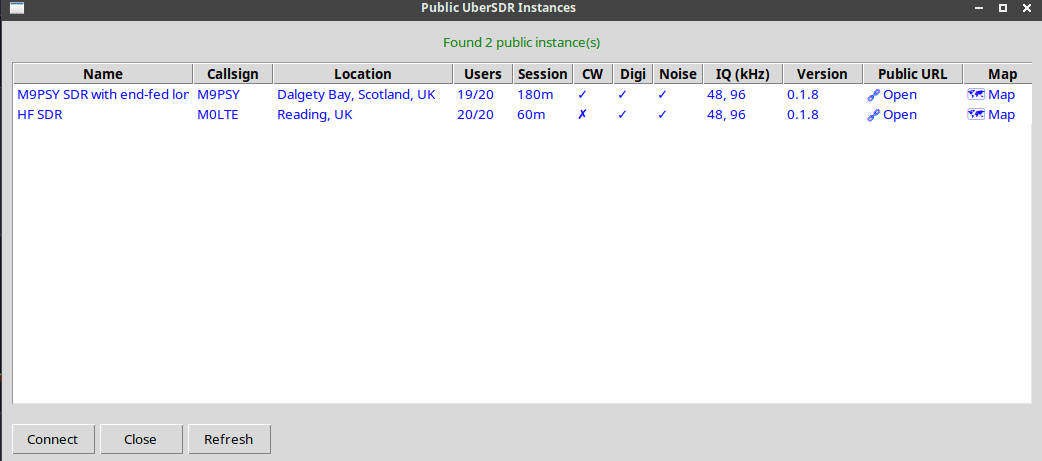
Instance Discovery
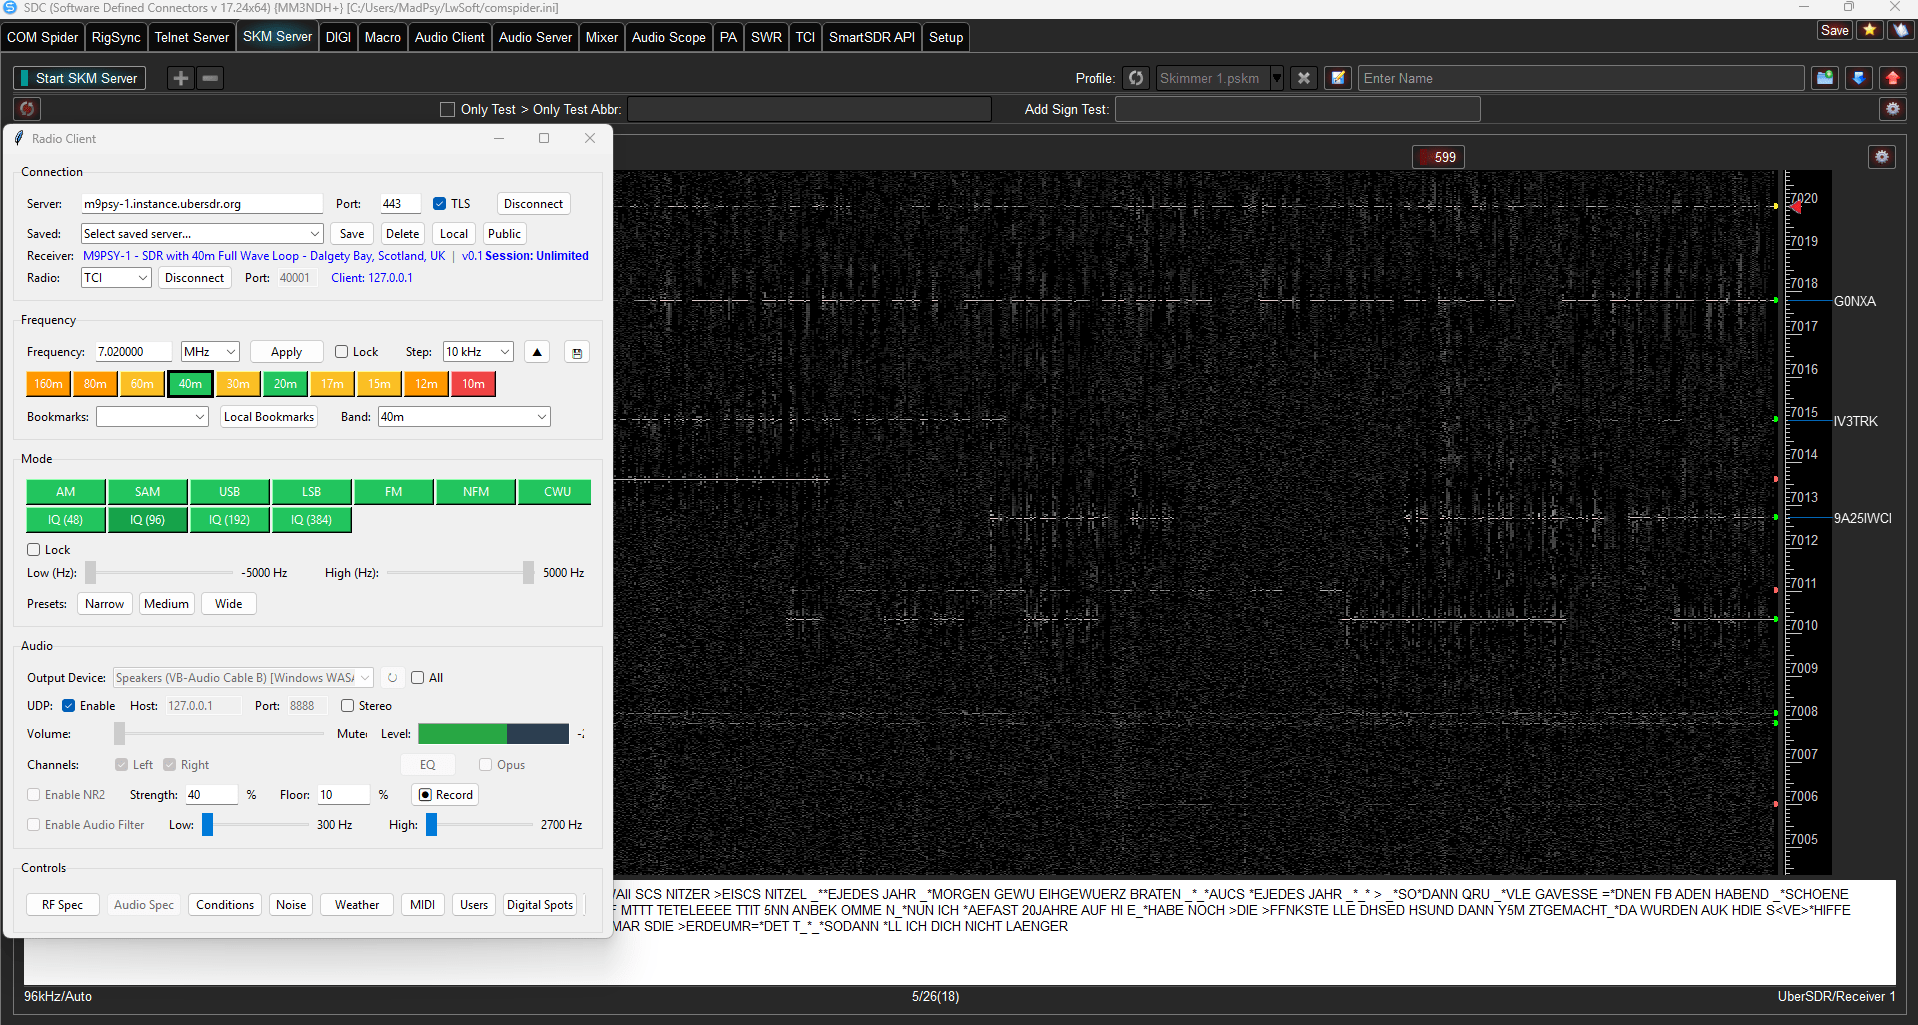
SDC via TCI (www.lw-sdc.com)
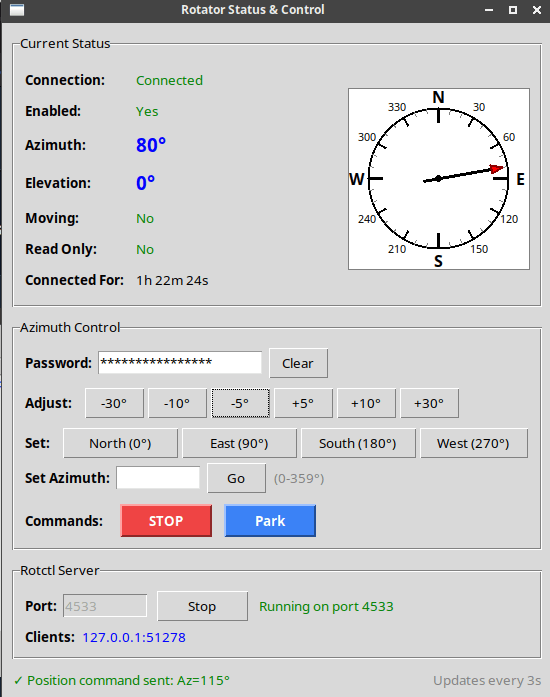
Rotator Control
IQ Recorder
Record multiple IQ streams up to 192 KHz each for later analysis and playback. Perfect for capturing contest weekends, rare DX openings, or monitoring multiple bands simultaneously.
- Record multiple IQ streams simultaneously
- Up to 192 KHz bandwidth per stream
- Built-in spectrum monitoring output
- SSB and CW demodulation
- Configurable automatic scheduler
- Perfect for contest weekend recording
Example use case: Schedule recordings across 20m, 40m, and 80m during a major contest weekend. The automatic scheduler can start and stop recordings based on time and day, capturing all the action for playback afterwards with software such as SDR++.
IQ Recorder Screenshots
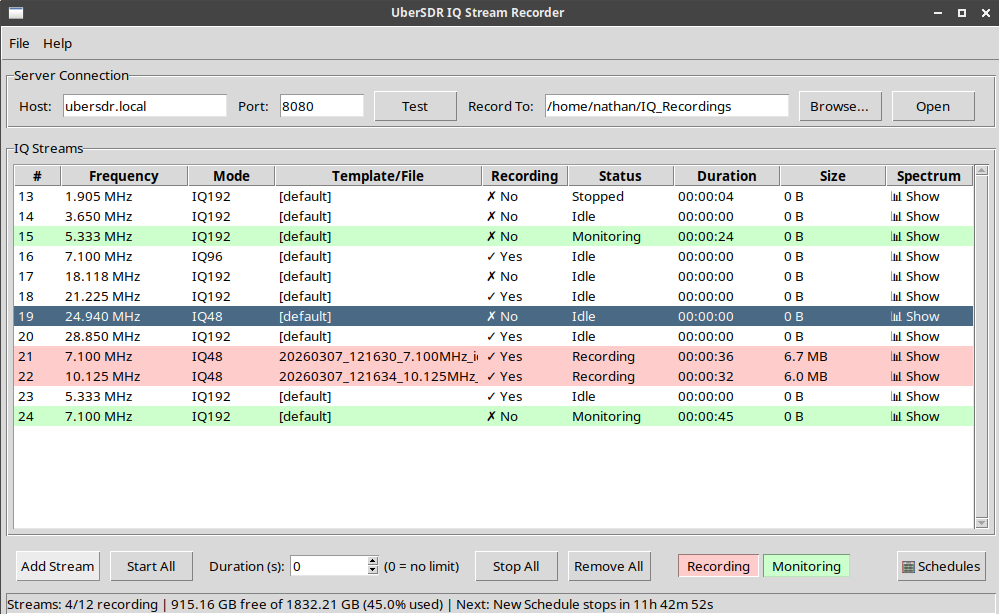
IQ Recorder Main Interface
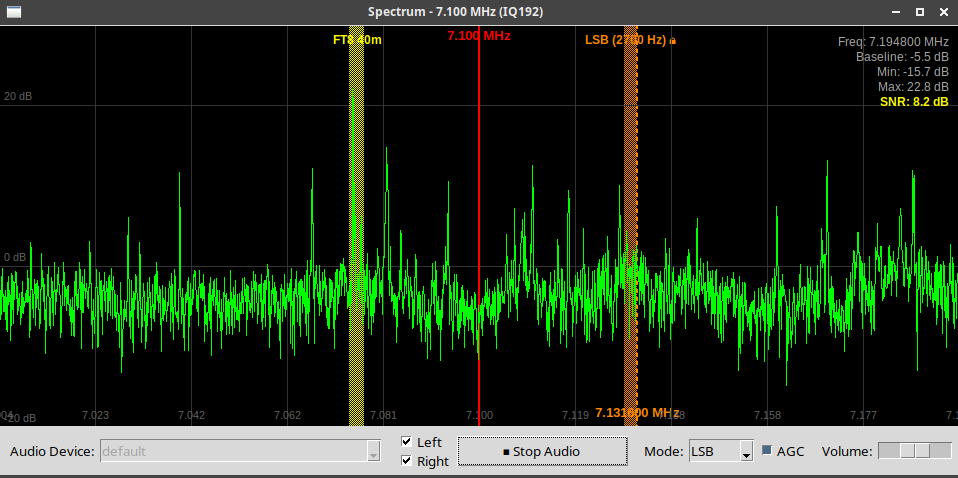
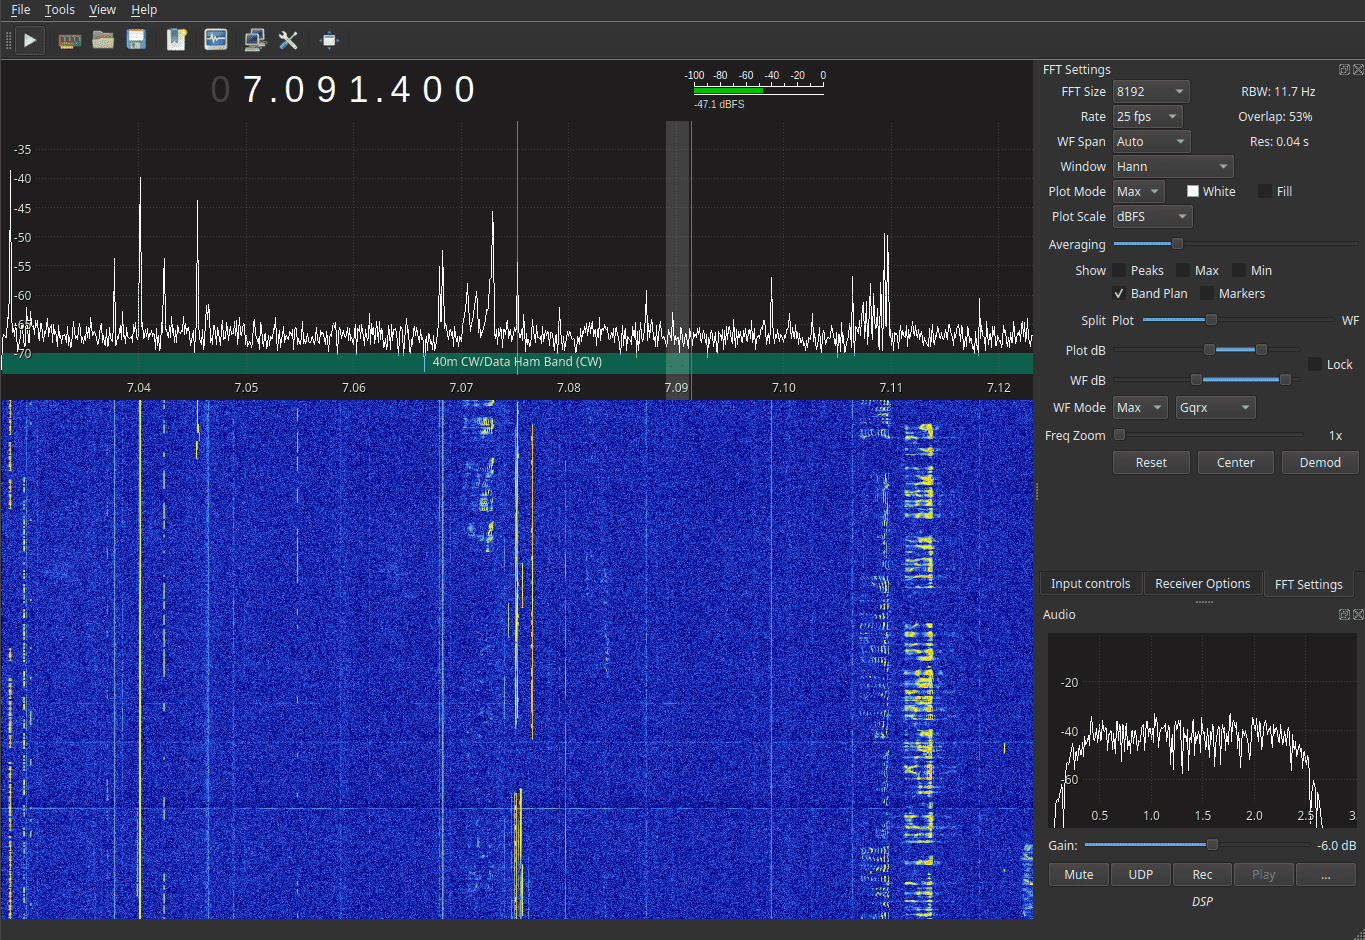
Spectrum Monitoring with Demodulation
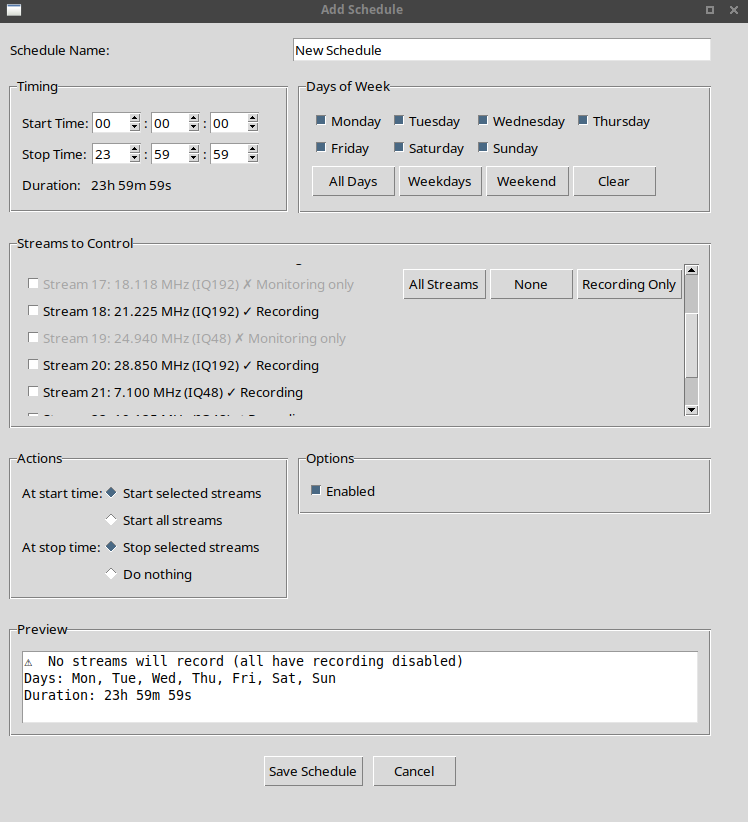
Automatic Recording Scheduler
Drivers
Drivers for third party applications so they can talk to UberSDR instances.
CW Skimmer
Driver for SkimServ. Connect to your local instance for CW skimming.
VE3NEA's Skim Server DLL, also works with CWSL.
SoapySDR
Driver for SoapySDR. Supports both local and public instances.
Works with SDR++, Gqrx, GNU Radio and many others.
HPSDR
Bridge application for the UberSDR host machine. Allows applications like SparkSDR and Thetis to connect using Hermes-Lite compatible protocol with 10 available slices up to 192 KHz each.
This is automatically installed by the installation script. Click here to download manually.

KiwiSDR
UberSDR has KiwiSDR emulation and frontend built in on port 8073.
Any KiwiSDR compatible client can connect to it and will act like the real hardware.
Note: There is a known issue with waterfall alignment but the demodulated audio is accurate.
Third-Party Application Screenshots

CW Skimmer Monitor (Afreet SkimServ)

SDR++ via SoapySDR
Gqrx via SoapySDR
SDC via TCI connection
Build Your Own UberSDR Instance
Set up your own UberSDR instance with affordable hardware and our Docker-based software. Join the network and share your local radio spectrum with the community.
What You Need
SDR Hardware
RX-888 MkII
High-performance SDR receiver available from AliExpress. Offers excellent dynamic range and wide frequency coverage.
Please note the RX-888 MkII is the only currently supported hardware. UberSDR runs the 888 at 64 MSPS and does not require any additional cooling.
Antenna
Receive Antenna
An active loop or random long wire make great receive antenna choices for HF reception.
Optionally add a low and/or high pass filter.
- ~1 MHz high pass filter
- ~40 MHz low pass filter
Filters are only really neccessary if you live near a high power radio transmitter.
Computer
Computer Options:
- Low: N100/N150 based MiniPC (new)
- Medium: HP EliteDesk 800 G2 i7-6700 MiniPC (eBay)
- High: Intel 13th Gen i7 or Ryzen equivalent MiniPC
Medium spec is sufficient for most stations wanting all band FT8 skimming and several web users. AVX2 is a requirement which is any Intel CPU from Haswell (2013) onwards.
Software
Docker-Based Deployment
UberSDR runs in Docker containers for easy installation and management. Simply pull the image and configure your setup.
Both Ubuntu 24.04 and Debian 13 (Trixie) have been tested and known to work with the installation script.

Why Build Your Own?
Contribute to the global SDR network
Full control over your SDR setup
Affordable hardware options
Low power consumption
Installation Instructions
Grab Your Mini PC
Will need a monitor/keyboard and USB memory stick to install Ubuntu.
Install Ubuntu Server 24.04
Create a bootable Ubuntu USB memory stick and install Ubuntu Server 24.04. Ensure to choose Ubuntu Server as we do not want a GUI. Make sure you select to install OpenSSH Server when asked.
Plug in RX-888 MkII
Using the provided USB 3 cable plug the SDR into the computer. Probably a good idea to attach the antenna at this point. Ensure it is plugged into the SMA socket marked 'H'.
Install UberSDR
SSH into your newly installed UberSDR computer and run the following:
curl -fsSL https://ubersdr.org/install.sh | bashConfigure UberSDR
Open a web browser on your desktop/laptop: http://ubersdr.local:8080/admin.html and log in with the password you set during install.
Download Desktop Client
Download the desktop client for your operating system. You can also access the web interface directly.
Enable Public Access (optional but encouraged!)
If you have bandwidth to spare and want to make your instance publicly accessible, use the public access wizard. Automatic TLS and DNS are available:
- Zero Config Tunnel (ubersdr.org) - easiest / recommended
- Port forward (ubersdr.org or own domain) - lower latency
- Cloudflare (own domain)
One web user requires between 100-200 kbps (bits not bytes!). The Zero Config Tunnel has been successfully tested with Starlink.
Admin Control Center
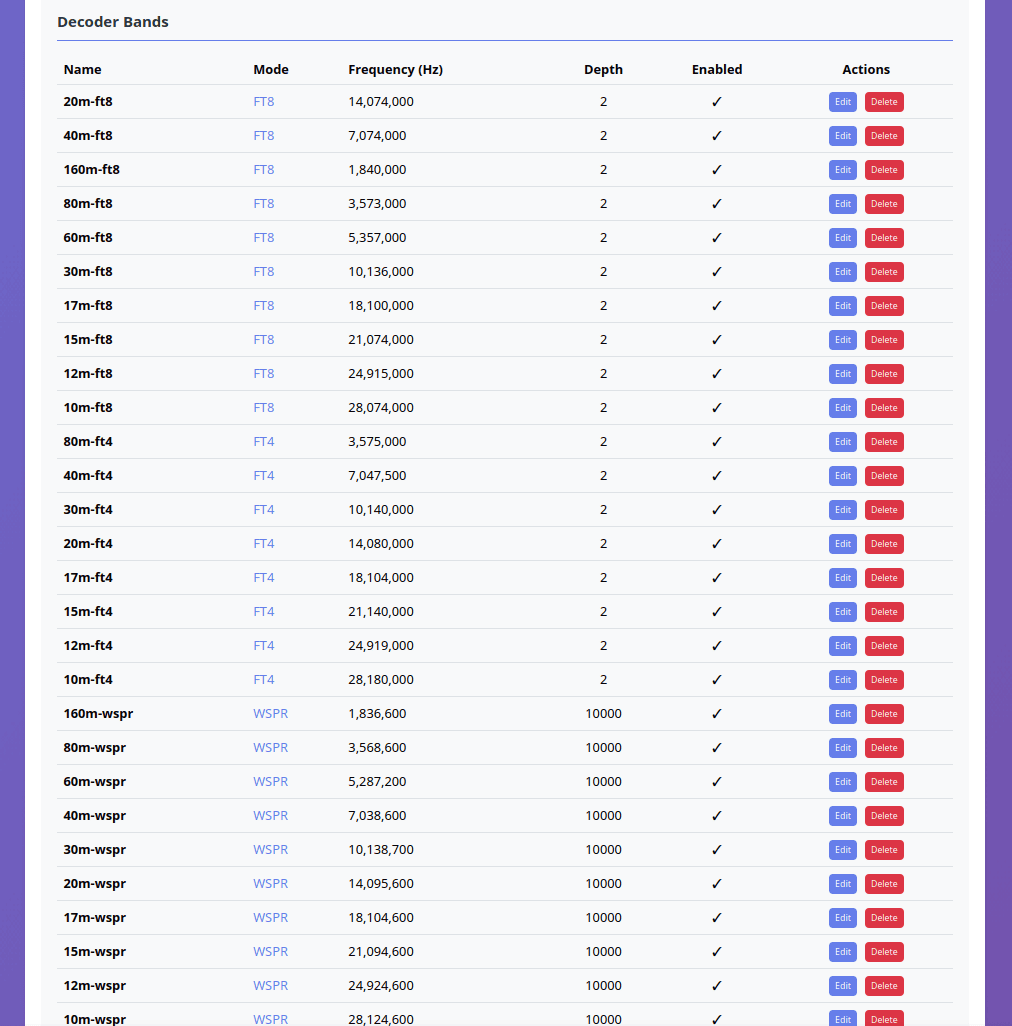
Decoder Management
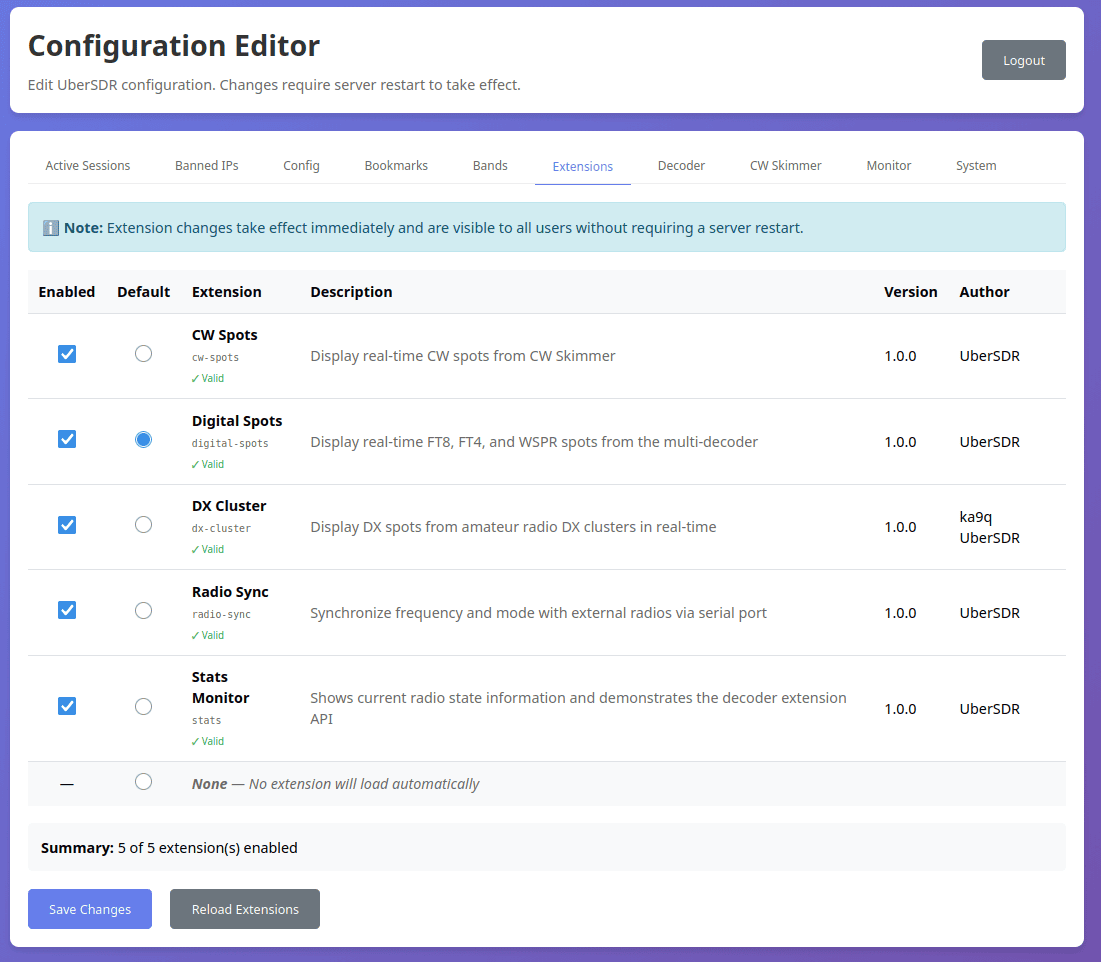
Extensions Configuration
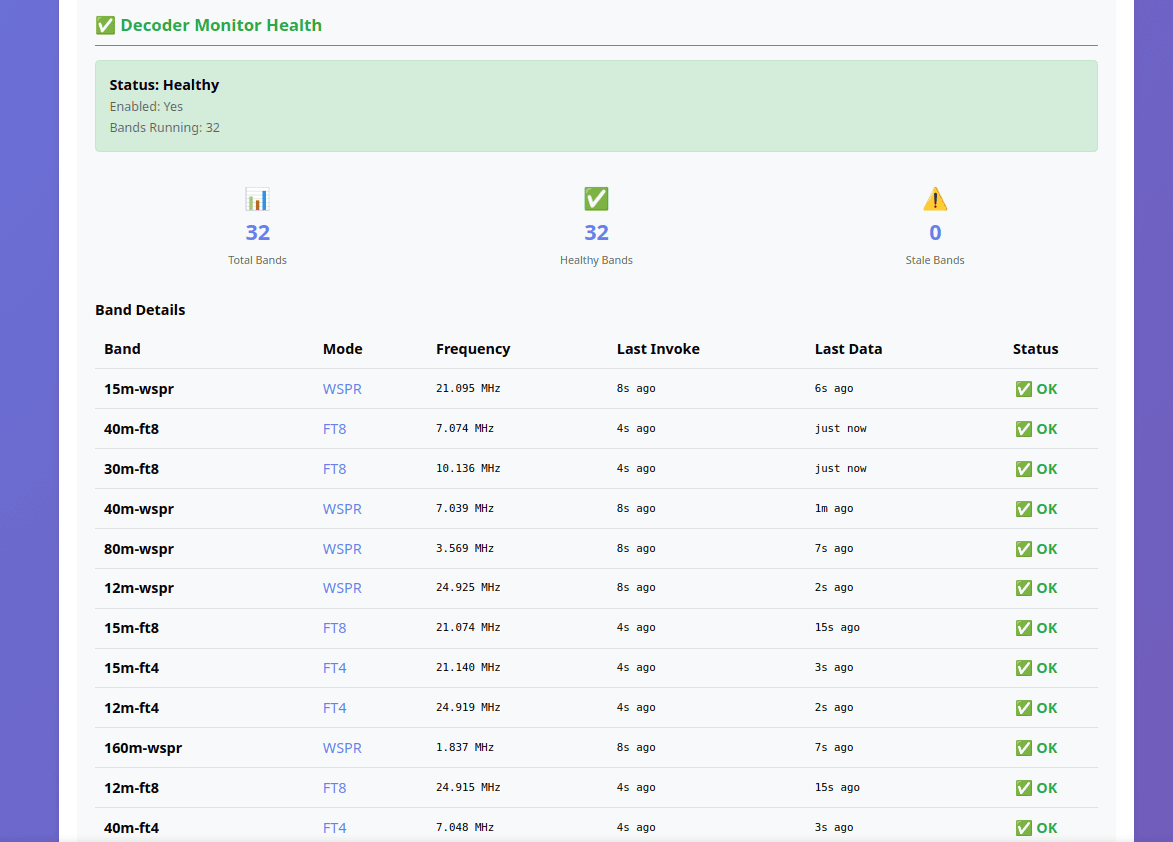
System Health Monitoring

Active Sessions
Getting Started
Choose an Instance
Browse the available instances map and select one near you or in a location of interest.
Connect
Click on an instance to access its web interface and start exploring the radio spectrum.
Tune & Listen
Select your frequency, adjust settings, and enjoy real-time SDR reception.